home for christmas!

19.12.11

Well, kind of home. Home for the next couple of weeks, then I'm moving to my grandmother's old house in Wimbledon. Then my mother goes back to Australia and Durham is my home for good! Slightly exciting but also sad because I love this house.

Right now we have the best window display ever. In my street everyone puts things in their windows, and my sister and friend decided to do something Christmassy.


Awwww. It's funny watching people walk past the window and then stop to gaze upon the glory of the penguins (they dance in sunlight, by the way). Everything is really Christmassy in Brighton generally at the moment. I mean, it is Christmas, but it seems even more festive here than up in Durham. ANYWAY. So yes, I got here on Saturday evening. The first thing we did was go to Street Thai for fucking amazing food and cocktails. I love thai food. Wow. Actually, everything I've done has revolved around food so far. We went out to breakfast the next morning, then went to my favourite cafe, then went out for mulled cider that evening...

... how very festive. Then today we went out for breakfast. I was also presented with a box of candy upon my return and I have eaten literally all of it by now. Let's see how much weight I gain over the break, shall we?


Where on earth did this ferris wheel come from? It was definitely not there when I left haha.

While I'm here and seeing as I haven't updated in a while, I'll also post some photos from Durham.
I wear this coat basically every day.

Starbucks Christmas drinks! Starbucks coffee is usually awful but I have to say... eggnog lattes are fucking good. 

ANYWAY, today is a bit rainy so I'm going to stay indoors and do some work. I'm so awful at writing blogs haha. Let me show you my Christmas outfit?

Well, one of a few. Haha. Recognise the fur? Pretty sure I wear it too much. But oh well. The jumper is from a giveaway by Fashion Your Seatbelts!

Anyway, nothing else to report so... goodbye!

Lumiere Festival!

20.11.11

Click here if you don't know what it is. I can't believe I only ended up actually going last night! I'd seen random little things around but I actually 'went' yesterday. It was so amazing. Almost unexpectedly so. And I took pictures! Not of everything, but still.

The giant snowglobe thing! Took seemingly ages for it to actually start 'snowing' but it looked nice either way hoho

A rainbow at night! Yes!


The Crown of Light, or at least a little snippet of it.

Okay now this was a little bizarre.

So was this, but in a slightly better way. Plus the music he was making was good.

This just seemed vaguely dangerous hahaha.

ANYWAY, you get the idea. Lights n' shit.

Another tutorial coming soon... when I get my sewing machine back from someone. Yes. Time for me to go and get some work done now (:

Bye!

Hyello

5.11.11


Long time no post!

So after weeks of forgetting to bring my camera out with me, I have finally taken some pictures of Durham! Yes! They're not amazing but... they will do for now hoho.

 I love this view and this photo does not in any way do it justice.

Once again, this photo does not do the cathedral justice! Obviously I am not the most fantastic photographer so... you'll just have to come and gaze upon its glory in person.

So, you get the general gist of things. Durham is a beautiful place. Yes it is. As you can see, everything is very autumnal at the moment. Much more so than Brighton ever was / will be considering how incredibly leafy it is around here. Despite being very pretty however, autumn leaves make everything incredibly slippery underfoot. I have come to realise over the past few weeks that I've made awful choices in terms of what shoes to bring to uni with me.

These are my uni shoes (minus one pair which cannot be photographed because it looks awful at the moment). I can only generally wear the awful shoes, or the first pair in the photograph. Everything else is deadly. I had no idea my shoe choices were so impractical until I came here, to be honest. Like I said, Brighton isn't leafy and the ground is pretty even. I could go out wearing any of these and it wouldn't be a big deal. Here, I even have to be quite careful while wearing the first pair (slippery). Maybe I need some hiking boots? Idk

Generally I am quite limited fashion-wise here because I couldn't bring all that many clothes with me, but it's not too bad. Here are a couple of outfits haha :|


Coat: vintage / scarf: Edinburgh Wool Company / bag: made it / shoes: Bertie
 Not the most attractive picture of me but... I'm wearing a red coat with gold buttons so all is well.


Dress: made it / sweater: second hand / skirt thing: Debenhams / necklace: Topshop / rings: H&M, Primark?, ChainlessBrain.com / shoes: vintage
Okay, why do I seem unable to take pictures which aren't a bit weird-looking? This is what I wore today. Actually, I ended up wearing different shoes... but yes. Otherwise this is it.

The ring was very very kindly sent to me by a company called Chainless Brain! It's now something I wear pretty much every day. I'm sure you agree that it's pretty awesome hohoho. Anyway, they do loads of different designs or you can choose your own. Check them out here!


Aaaaand now it's time for me to go to dinner. Bye!

Update

5.10.11

Hi everyone. I really really wish I could update properly, but I started university last week! I feel a little awkward asking people I don't know to take photos of my outfits haha, but I do have my sewing machine with me so should be able to do a tutorial soon.

Anyway, Durham is lovely (albeit a little small) and I'm having a pretty good time.

Hope you are all well (:

Tutorial: Turn a jacket into a cape

19.9.11


Now, I was going to make a cape from scratch (honest) but as the only thing I could really use for fabric was so close to what the end product would be, I decided to just make a 'reconstruction' tutorial.

Now I'm sure there are other ways to make capes, but this is just what made most sense to me. There are no pockets (though you could certainly add them if you wanted) but there are little holes for your arms to go through haha.


You will need...

A sewing machine, seam ripper, scissors, one blazer / jacket / coat. The jacket I'm using is massively too big for me so I've made the shoulders smaller. You wouldn't have to do this if you used a smaller jacket, obviously. The only thing is that the length of the cape would be limited to the length of the sleeves unless you decided to add another piece on the side... but that could look weird? ANYWAY, do what you want.

Remove the sleeves using a seam ripper and set aside. Cut from the shoulders down both sides, from where you want the shoulders of your cape to sit. Either refer to your own shoulder measurements or use a jacket that fits you as a guide.

Use the seam ripper to open up the sleeves. Cut the sleeve (with the lining) into a kind of... smoother shape :| 

Right sides together, sew the 'sleeve' to the front and back of the jacket, stopping where you want your little ARM SLIT (what a terrible name but 'arm hole' is kind of already taken). Do the same with the lining. After that point, sew the main fabric to the lining fabric of the same piece.  So, the sleeve part will not be joined to the 'body' at that point, it will just have the lining and main fabric joined together. You know what I mean. When you want the slit to stop, rejoin the sleeve + body in the same way as before. Do the same on the other side. Now all you need to do is hem the whole thing (you should have to do some trimming first) and you are done.


Bye! (:

recent outfits n things

8.9.11

I got this done the other day! Yes, yes, I have joined the Mucha tattoo crowd but... well, yeah. I think this illustration is beautiful. She did a really good job and I am so pleased.. Just braggin'. 

Sorry for how bizarrely portrait-y this picture is by the way. It's even making me feel awkward. I'm going to keep it up there though, because my hair looks nice. YEAH.

But on to other things... here are two outfits. I have been wearing so much white recently. So much. Actually, I have been wearing this tight / shoe / dress combination a lot. I have worn this dress three times this week. These shoes almost every day. Maybe I'm just getting lazy, idk. Fun fact: this dress is the most expensive item of clothing I have ever bought. That doesn't say much, as 80% of my wardrobe is second hand, BUT STILL. I've got a lot of wear out of it and it still looks just as nice as it did back when I wore it to my Year 12 formal in '08!


I've worn variations of this outfit a lot recently, and figured I should take a picture before I get bored, but sadly I don't think the brightness of the coat really comes out in this picture! Maybe it doesn't look as impressive in real life as I think it does hoho.

Aaanyway...

Does anyone have anything in particular they'd like a tutorial for?

Most of the time I make things just because I want them, but I don't really want anything right now haha. If I have the right fabric (and whatever else is needed) for it, I will try anything.

Oh, and thankyou Kat (we very briefly ran into each other when I was in Berlin - what a coincidence!) for slipping me into her online magazine Frock&Roll! Click here to read the whole issue.


Bye!

Things to do with a button-down Pt. 2

1.9.11

Sorry I'm so flaky haha. It's the unfortunate combination of business + laziness. Oh, and I also have to apologise for the slightly bad photos in this tutorial! There's not a lot of space in my room right now. If anything is unclear, just ask and I will explain! Luckily this is probably the easiest tutorial I've made yet, so you shouldn't have any trouble.

You will need...


Two shirts + a sewing machine or needle and thread. Pick whatever colours you like / have. The shirts should be of similar material / weight. If one of them has more of a structured collar, you might need to sew some of the interfacing from that shirt into the other shirt. Or not, up to you.

What you must do...

From the collar, cut along the middle (or about 2cm to the right) of the back of one shirt (the one with the collar you want to keep) and remove 1/2 of the shirt. Do the same with the other shirt, but cut off the collar.


Oh god this is the most useless photo ever. Basically, right sides together, sew the collar to the other shirt-half. Make sure the space between the edge of the shirt and the start of the collar is even on both sides. Right sides together, sew the shirt-halves together along the edge you cut just now, and you should have one complete shirt!


In my case, because I have a mens shirt and a womens shirt I ended up with two sets of button holes. If this happens to you too, DO NOT WORRY. You can sew buttons on anyway and the old button holes will be covered up. If you don't have that problem, remove the buttons already on the shirt, and replace with the buttons that were on the other shirt. If you want. Up to you. Either way, you might need to reposition the buttons to make sure they match with the other shirt. BASICALLY, at this point you need to sort yer buttons out.


Cut off the sleeves. Or leave them, idk. Put it on, see if you want to take it in at all.

Take it in if necessary, make the shoulders narrower, hem the sleeves and the bottom, and you are DONE.


Goodness gracious me

29.8.11

I haven't updated in ages so... just an explanation!

I got my a level results the other day. I got A*A*A + an A* for the extended project. I'm not happy about that A, but I've made my offer. I'm especially happy about being awarded full marks for my extended project because I worked SO. HARD. on it. I wrote it on whether prostitution should be legalised, and I actually started with the belief that it should be. That changed when I actually did some research, and I'm so happy I did. It has completely changed my perspective on the issue. JUST SAYING. I wish I could post my discussion on here for you to read but... I can't quite bring myself to re-read it haha

So anyway, that means I made my offer to study Law at my first choice university - Durham (Van Mildert)! I'm so happy! So happy! I've spent the past couple of weeks filling in all my forms (I still have one left), reading as much as I can and generally trying to get my shit together. Because my parents are leaving the country (well, my dad has already left as of two days ago) and my boyfriend and other Sussex students will be taking over the house, we have to move out. Oh, and I randomly went to Cardiff for a couple of days.

My sewing machine is still out, and I will bring it with me to uni, so the tutorials will continue. I will do the second button-down tutorial today or tomorrow! Anyway, just thought I would post an explanation / life update.

Bye!

x

Tutorial: Coat!

13.8.11

Hi everyone. Just in time for the weather getting ever so slightly cooler, you can make yourself a coat! As you can see, this is slightly different to the coat I posted in my last post, but it's just as easy to make. I haven't included pockets in this tutorial, but you can refer to my past tutorials to get an idea of how you might put pockets in, or maybe use this tutorial to make patch pockets. I also haven't added buttons to this coat (I don't have buttons that match right now) but the design is so simple you could easily add buttons and buttonholes yourself. ANYWAY, on to the tutorial.


What you need...

About 3m of medium - heavy weight fabric and 3m of lining fabric (depends on how long you want it to be), about .5m (maybe more) of another fabric for the collar if you want, about 1m of interfacing, sewing machine, pins, tape measure, seam ripper if you have one.

What you must do...


1. Cut out your pieces
When I say 'cut x 2', you must also cut x 2 of your lining fabric. The length of the diagrams is not the length I think the actual pieces should be! I have not measured the length as it is completely up to you and makes no difference to how the coat is put together. It might help to draw these pieces on paper beforehand (art paper / baking paper / butcher paper, whatever). This would enable you to get a better idea of the size of the pieces without cutting into your fabric first, just in case you make a mistake. If not, it doesn't matter, just be a little more careful, and remember that it's better to make things too big than too small.
----------------------------------------

When cutting your main fabric, include the shaded area. When cutting your lining fabric, stop at the yellow line (add a couple of cm for a seam allowance). Also, with seam allowance, cut two of the shaded part only out of both your main fabric and interfacing
A:
From your shoulder to the bottom of the armhole. Don't make this too small! Mine was about 30cm
B:
Plus seam allowance, from the collar to your shoulder. You could make this longer, depends on what you like. Mine was about 13cm
C:
This depends on how wide you want your lapel to be. The whole piece should be wider if you want a double-breasted coat, 23cm
d = 14cm (top to bottom)

-------------------------------------------------

Cut one on the fold. For your lining fabric, the fold should be at the yellow line - the main fabric will have a pleat at the back but the lining will not!
A:
Same length as the (B) above!
B:
This is the neck. Mine was about 11.5cm.
C:
About the same as (A) above.
-------------------------------------------------


A:
56cm
B:
9cm
It's really up to you, though, and also depends on how wide you cut your front piece. Keeping in mind the fact that it will look smaller when all sewn together, pin this piece to your front piece to see how it looks! If it's too big, trim it. If it's too small, you can always trim down the front pieces a little (:
-------------------------------------------------

A:
must match the armholes, but it's an easy fix if you get it slightly off (as you will see when you sew the sleeves on)! Mine was about 30cm. Once again, how long / wide / tapered the sleeves are is totally up to you. 
-------------------------------------------------

2. Sew
Right sides together, sew the shoulders of the back piece (A above) to the shoulders of each front piece (B) above. Take the little piece you cut from the shaded bit above (front diagram) and sew it to the front piece you cut from the lining fabric, attaching interfacing to it in the process. You should end up with a lining piece to match the front piece made from the main fabric. Sew the front + back lining together in the same way.
Along the yellow line in the diagram for the back, right sides together, sew one line of stitching. Use the longest possible stitch on your sewing machine for this (or hand sew), but go over the top inch or so with a normal stitch.  You do not need to do this step to the lining fabric.

It's a little hard to see on my fabric, but opening up the back piece to lie flat, iron the fabric you've sewn. As you iron, keep making sure that the stitching is in the middle. About an inch from the top, stitch over the fold a  couple of times to reinforce the area where the pleat will end.
Unpick the long stitches! You should now have a pretty pleat.
Right sides together, sew the side edges of each sleeve piece together, and again with the lining fabric.

Turn the 'body' of the coat inside out, so the right sides of both the front and back pieces are together. Matching up the bottom of the armhole on both back and front pieces, sew from that point to the bottom of the coat, and repeat on the other side. Where both pieces have just been joined together, at the bottom of the armhole on one side, match this up with the seam (the bottom) on one sleeve. As always, right sides together! Sew from this point all around the sleeve / armhole, so they are joined together. Repeat with the other armhole / sleeve and do the same with the lining fabric. You should now have two coat-like things, one in your main fabric and one in your lining fabric.
Eeeeeven though I've divided one side of my collar into two, you don't need to do that. I mean, you can if you want but it's not necessary. It means you can secure your interfacing down the center if you want. Anyway, sew your interfacing to one of your collar pieces, either into the two underside pieces when you join them together, or basted around the edges.
Right sides together, sew both collar pieces together along the widest edge, then down the sides. Cut the corners and turn inside out.


Right side of the main fabric against the underside of the collar, sew together at the neck edge. Make sure the collar is perfectly in the middle.
Do the same with the lining fabric so the collar is now anchored between both sides. Unfortunately I didn't photograph this part but... turn the coat inside out so the wrong sides of the main fabric and lining are facing outwards, and sew along both outer edges (i.e. the edge where both sides of the front meet when you put the coat on... THE FRONT SIDE EDGES. I'm terrible at explaining things). Clip the corners and turn the coat the right way round again. Iron (+ maybe stitch over the top if you feel you need to)! The only exposed edges now should be the ends of the sleeves and the bottom of the coat.
Get a hold of the sleeves and match up the seams on both the lining and main fabric. With the right sides together, sew the lining and main fabric together at the end of the sleeve. When you turn it the right way again, you should have something like the above picture!
Your lining should be shorter than your main fabric so... trim it a bit if necessary. All you really need to do now is hem both the lining and main fabric. You could, if you wanted, turn the whole thing inside out and actually sew the lining to the main fabric at the bottom (leaving a little gap to turn it out the right way again and hand sew closed), but I'm not going to do that.

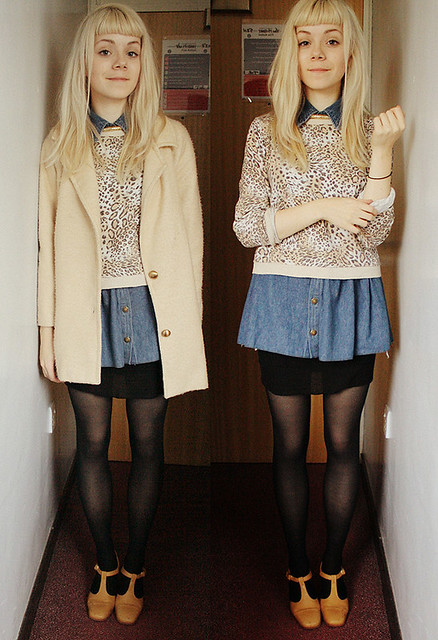
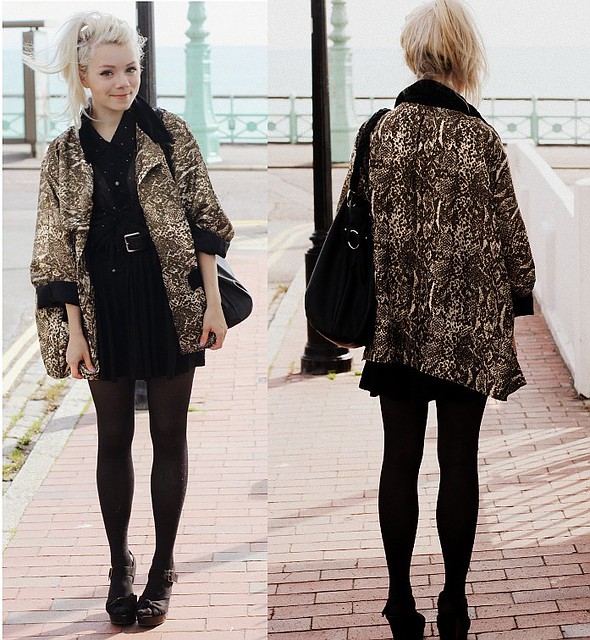
So... now the outfit I wore with it hoho. As you can see, I actually ended up adding pockets. I did this the day afterwards and didn't photograph it - I'm sorry!


Bye everyone!

Theme designed by Filipa • you are the poet