I got back from Andy's yesterday so expect a big rambling post soon. Something really really scary happened to me, actually. I feel like I've told everyone I know so it's time to tell the internet too hoho. I will write about it in my next post, but for now I have a new (kind of) tutorial.
This is awfully similar to my reconstructing dress tutorial except... well, it's using a shirt rather than a dress? haha. WELL, I realised today I have a ridiculously large amount of button-downs. I don't even know how it happened, they've just accumulated over time. I was thinking about ways I could make use of them today, and decided it would be fun to do a little series of button-down related tutorials. Just simple ways to change them up a bit. This is my first, simply because I felt like making a dress this morning.
What you need...
One large shirt, a sewing machine, scissors, tape measure, seam ripper if you have one.
What you must do...
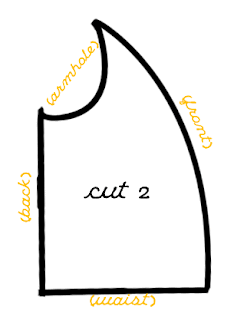
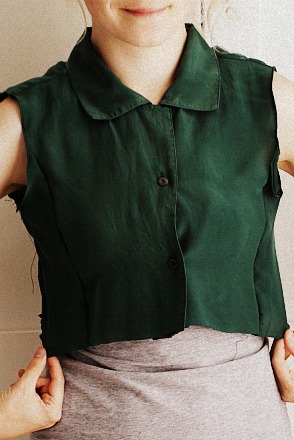
Cut this kind of shape out of your shirt. The top should be as wide as you want the shoulders to be (plus seam allowance) and the sides of the front must go down the center of your boobs, a little narrower at the bottom. The piece should end at your waistline (or where ever you want the waist line to be). The back should go down just outside of your shoulder blades.
With the rest of the shirt, cut two of these pieces to join the front and back of the piece you cut above. You might need to make the (front) line more curved if you have a bigger bust. Remember, it's better to make it too big than too small so you can change it later if necessary.Try to waste as little fabric as possible! Use a tape measure to check that it will be big enough sewn together. Right sides together, sew the (front) to the side of the front piece, and then the (back) to the back piece, and again on the other side.
Try it on to check it fits, trim the bottom / armholes if necessary. Zig-zag over everything if you so desire. Hem the armholes, trim all the loose threads etc. etc. Looking at this picture, I probably should have added another button SO if it is a little gaping around the boob-area, fix this now.
Take the bottom of the shirt (easier to keep it buttoned for now) and trim to make sure both sides are the same length. Use your seam ripper / scissors to open up the sleeves for extra fabric to add to your skirt, making sure everything is the same length. Right sides together, sew all the skirt pieces together to make a loop. Hem everything. Gather your skirt at the top (I do this by sewing the longest stitch along the top and pulling one thread, but you can also get gathering foots for your sewing machine), making sure it is the same length gathered as the bottom of the bodice. Unbutton the skirt and bodice. Right sides together, matching up the edges, sew your skirt to the bodice.
You should now be finished!
Hat: vintage
Collar: vintage
Coat: vintage
Dress (underneath) H&M
Shoes: New Look
Collar: vintage
Coat: vintage
Dress (underneath) H&M
Shoes: New Look
Bye!


Cutest pictures ever...makes me want to have blonde hair. Where is that cute cape/poncho from. I love it.
ReplyDeleteLiz
I really love your blog , discover you blog in lookbook is the best thing that I do! I never think in do a dress with a t-shirt , but its a god idea to recycle some old lovely clothes :D
ReplyDeleteEnjoy!
http://thetrendtracker.blogspot.com/
That coat is the cutest/chicest/coolest (alliteration yo) I have ever seen! I'm assuming you attached the fur trim yourself with your wizard sewing abilities? It is so awesome. So's the hat by the way.
ReplyDeleteHow I wish I could sew..... unfortunately however I was not blessed creatively in that way, if only I could solve a math problem and it would result in a beautiful dress......if only.....
Aoife - cooltured.blogspot.com
Oh! I love your blog!! Kisses from Brazil!
ReplyDeleteYay! You have a blog! Your tutorials are great - I can't wait to put them to use! All I have to do is find worthy fabric/old clothes.
ReplyDeletex Michelle | thefeatherden.net
wow, Love this!! So simple aswell! :)
ReplyDeleteI've only just stumbled across your blog, and after only reading a few posts, i love it! ha
x
www.tea-an-toast.blogspot.com
Love this! I'm definitely going to have to try it out, thanks for the inspiration!
ReplyDeleteThanks everyone (:
ReplyDeleteI have acquired an abundance of large button downs over the years and now I finally can put them to good use thanks to this tutorial of yours--Thanks!
ReplyDeleteThis, is amazing.
ReplyDeleteLove http://www.wonderingwolves.blogspot.com/
Hi, just came across yr blog a couple of days ago and I'm so glad I did! I love finding inspiring things to do with clothes and I knew I had to try this tutorial, so I did. here's the result (http://neonandmaria.blogspot.com/2011/08/232-long-button-down-shirt-turns-into.html)
ReplyDeleteI've linked to yr blog off course ^^
Thanks for this tip. I'm going to try the coat as well :)
X
Love it!! :D
ReplyDeleteOne large shirt, a sewing machine, scissors, tape measure, seam ripper if ... button-downshirt.blogspot.com
ReplyDeleteThis is my first, simply because I felt like making a dress this morning. ... buttondownshirtdress.blogspot.com
ReplyDeleteNice article! Thanks for sharing this valuable blog with us.Fashion Anything
ReplyDelete